Even though I haven't posted what I created in the last couple of days, doesn't mean that I haven't been creating! Here I'll have to catch you up with what I've created!
The first one is a Valentine card that was ordered for a young boy. The digital image is from Hambo Stamps! The background is a technique junkie technique called plaid. When I originally made that background I didn't like it and threw it to the side.....but it was perfect for the dog! Hope you like him!
The next one uses a free image I got from a recent blog hop at CDAC (Crafter's digital Art Center) from a darling company called DoodlePantry. It is such a happy image! I used an 'out of the box' technique for it.
This next card also uses an image from the CDAC hop from a company called CS Designs. I used a technique called "Neutral Shadows" from the most recent TJ newsletter. When I first downloaded this image, I thought that I wouldn't care for it as much but with it colored, I LOVE it! Colored with copics then the bow was cut out and embossed after coloring with Versamark and a sparkly clear embossing powder. Thank you CS Designs.

The next card uses an image from Priscilla Styles. This wasn't a freebie but a beautiful set I purchased from her. It didn't turn out exactly like I wanted......I was a little disappointed in that....but I like it just the same. Next time I want to layer the flowers more and put it on a square card. I think it is the card size that I really don't like for this image. Another thing I would do different it to use a printed sentiment inside the heart and much larger than the little tine print on the heart I used. It does look sooooo much better in person. The ribbon photographed really funky! Colored with copics.

Next is a sweet old fashioned Valentine image from Twisted Papers. Isn't he just as sweet as can be! I decided to make him really pop that I would level him up several times. The balloons have three layers (base and two more) and the boy has two layers with a third layer only from the waist up. Instead of keeping the layers flat, I used my took to round them a little to give more dimension. When I got done with this card, I was terribly pleased with the depth it seemed to have. Not just with the little boy but with the color of the card as well. The background was Cuttlebug highlights and that layer really made it in my opinion! I have 26 thank you cards to make for my rhododendron society so I think I'll use this color combo with a red flower. It should be a real eye catcher! I posted a side view of this card so you can see the rounded layers.


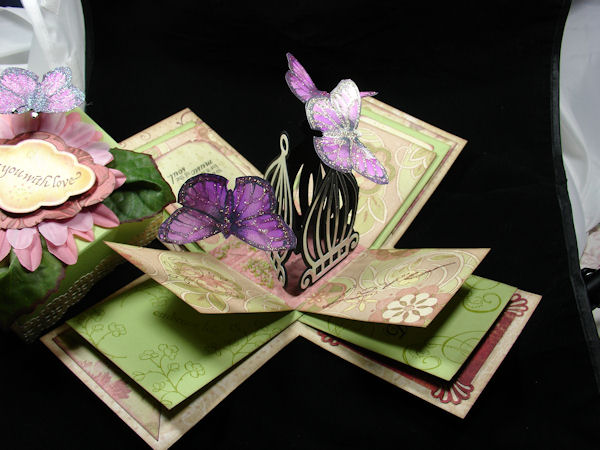
Finally!!!!! I bet you thought this post would NEVER end! When I had my card sale in October I made these Exploding Surprrise Boxes and they were a huge hit. I ended up making 22 of them!!! These last two were ordered by a friend who didn't need them until this time of year. Just before I ran out the door to deliver them last Saturday I snapped a few pictures. Now I wish I had better pictures of them. I think you can get the idea though. There are 20 different surfaces on the different layers. Some people use the layers for photos but I put sentiments or decorations on my layers. The bottom layer has two sections that have a pocket so that the person can insert a gift card or money or whatever. The sentiments were pretty generic so that it could be used for lots of different occasions. The middle birdcage was cut from my new Cricut...(I LOVE my Cricut) and the butterflies are 'suspended' with an acrylic strip cut from a Cuttlebug folder package! Around the base of the birdcages is FlowerSoft to create a little interest! I had the flowers that I used on the tops for many years and am happy to find a use for them. It is hard to see but the top butterfly on the lid does have wire antennae. Hope you enjoy them! Each box took about 3 hours to finish!


3 comments:
All wonderful!!! The box is AMAZING!!!!!
These are just wonderful and so gorgeous.
There is definitely a lot of work in this
and I can see why it makes so long to make
but it is worth it!
I absolutely *adore* this box! You made excellent color/paper choices. Now I'll have to CASE it! :)
Post a Comment